We are now at the stage where we can take a closer look at menu planning! For this discussion, we are assuming that the expedition is a wilderness thru-hike. As well, at this point in the planning, the research of individual components such as: landscape, weather, budget, etc. have been investigated. Other factors such as the number of people participating in the expedition, their food preferences, and the total estimated number of days on the trail are also known.
We have gathered a basic food items list, that can be found in most grocery stores in North America. This list details the caloric content and macronutrient per serving size of each food item. This list can be found here (at the bottom of that page).
From this list consider options for breakfasts, evening meal, and mid-day meals/or snacks. Serving size is important to consider.
|
Hiking in the Olympic (USA) mountains with friends, we decided to share meal planning. Pamela oversaw breakfasts. We were surprised to find that our friend’s idea of breakfast was one packet of quick oats each! We could have eaten four packets at least.
Weighing and measuring snacks and meal portions prior to leaving will minimise miscalculations for those extended trips. Consider bringing additional food packs for those extra hungry days, or to help a stranded hiker along the way.
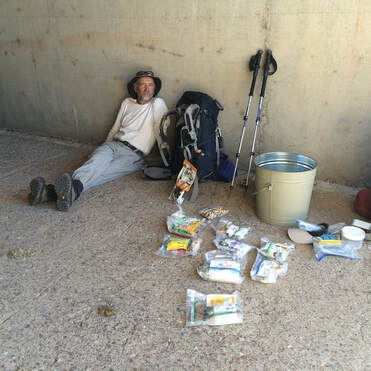
We met Sheba far away from any town, or resupply location. She had run out of food. The next exit point was 2 days away. Luckily, we had an extra food packet we could give her. We often have an extra day’s ration with us - just in case. We were happy to help her out.
|
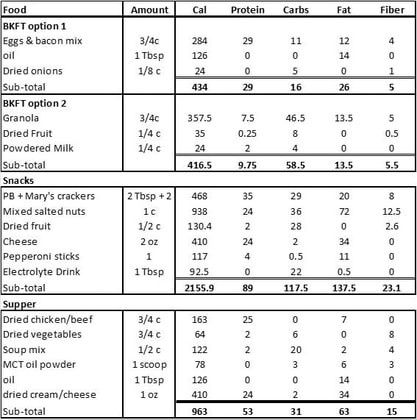
Our preference is to split our food intake into 6 meals each day. In a reference to the Lord of the Rings, the meals are ‘first and second breakfast, 'elevensies', onesies’, supper, and bedtime snack. Breakfasts and middle-day meals/snacks consist of a higher percentage of carbohydrates, with some protein and fats. The carbohydrates digest quickly and give immediate energy for the journey, while proteins and fats provide a slower release of energy for hours to come. The larger meals are typically eaten at the end of the walking period to allow our digestive system the time, and energy, to digest the food and for our glycogen stores to replenish for the following day. In colder climates consider eating the large evening meal close to bed-time. The heat generated by digestion will help keep you warm.
This next chart outlines a menu based on a 3,000 Calories per day. For those who need closer to 5,000 Calories/day, increase the portion sizes, add more snacks to your day. Eating enough on the trail is hard work!
This next chart outlines a menu based on a 3,000 Calories per day. For those who need closer to 5,000 Calories/day, increase the portion sizes, add more snacks to your day. Eating enough on the trail is hard work!
|
When we walked the AZT, I had selected five different dried fruits for our menu. Each day we would enjoy a different fruit selection. What a treat! I devoured them, savouring their sweetness. I miscalculated on the dried prunes… doubled the recommended daily amount… At the end of the day, I realised my mistake when my digestive system had something to say!! Calculate generous portions but not too big.
Variety in our evening meals is key. Whether we opt for store bought freeze-dried meals, home-made dried meals, or blended meals from items found in grocery stores, the options are endless.
When we make meals at home, we chose from a selection of stew recipes that add differing flavours to the menu. Chilis, curries, stroganoff, Mexican bean medley, etc. Any stew you cook at home can be dried. Remember to take note of the portion size of the wet, cooked meal prior to dehydrating. This way, the dry portions will be realistic. |
|
When time is limited, and home-made dehydrating is not an option, we purchase food items in grocery stores, or bulk food stores. Blending a bone broth mix, soup mix, or a side dish packet with additional dry vegetables, powdered cheese, herbs, and spices can create a tasty meal. Once on the trail, we add coconut oil, tuna, sausage, or cheese to complete the meal. If we have access to a fresh food market, we add fresh vegetables, and cooked meat to boost the nutritional content. |
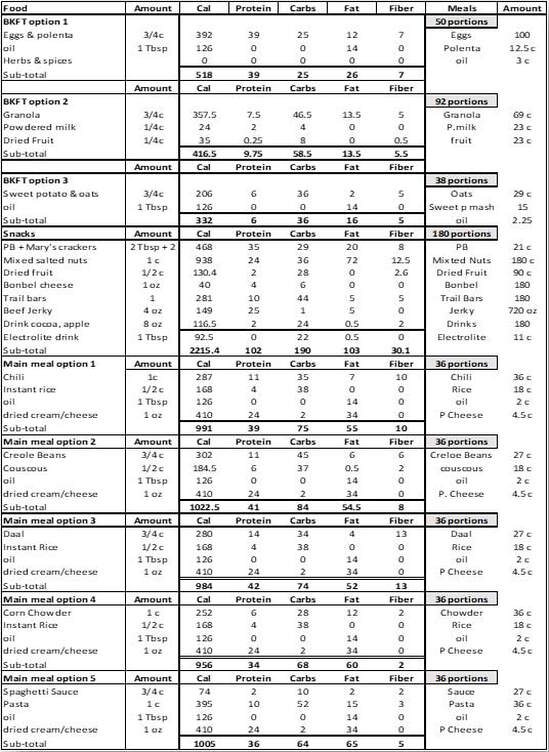
For an estimated seventy-day wilderness thru-hike (see table below), we prepared home-cooked meals for an additional 20 days. In this way we would have extra food packets for rest days, and emergency rations. We mixed and matched the following giving us a fifteen-day rotation plan.
We chose three breakfast options:
Daily snacks included
Evening meals varied from:
Drinks included electrolyte powder, hot chocolate powder and apple cider powder.
Once the menu was developed, we calculated how many portions of each item we would require. This gave us the grocery list.
We chose three breakfast options:
- Granola with dried fruits and nuts
- Eggs and polenta
- Sweet potato oatmeal
Daily snacks included
- Five different dried fruits: apple, mango, cherries, dates, and prunes
- Five types of crackers: fish crackers, Mary’s, Rice crackers, Vegetable Thins and Bits-and-Bite mix
- Cheese, beef jerky, trail bars, peanut butter, and mixed salted nuts
Evening meals varied from:
- Chili with rice
- Creole beans and couscous
- Dahl (curried lentils) and rice
- Corn chowder and rice
- Pasta and cheesy tomato sauce
Drinks included electrolyte powder, hot chocolate powder and apple cider powder.
Once the menu was developed, we calculated how many portions of each item we would require. This gave us the grocery list.
|
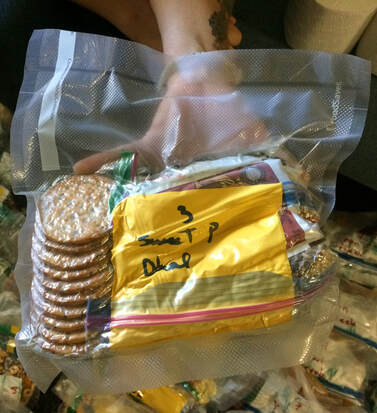
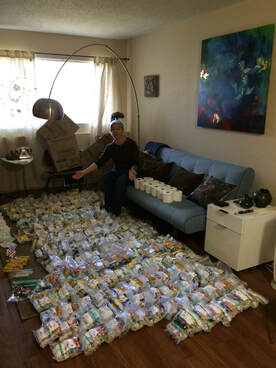
Once all the recipes were cooked and dehydrated, the meals and snacks were packaged into individual portions and stored in Ziplock bags. The day’s ration was then packaged into one vacuum sealed bag for one person per day. They were labelled describing the breakfast and supper selection in each bag. We had 180 packets of food for our trip (ninety days for two people). Each packet weighed about one kilogram (2.2 lbs).
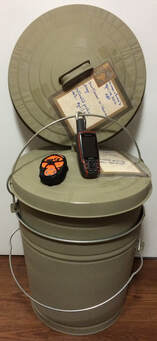
There were 17 food caches along the AZT. Because we had some concerns about shipping across an international border home-made dehydrated foods, we chose to drive the food across the border. If any issues arose, we could make alternative plans once in Arizona. The food boxes made it through customs! The caches were strategically placed along the trail prior to leaving for our trek. Reminder: for repackaging store-bought foods, measure the amount of each item needed for one meal (individual or group) and place them in a Ziplock bag. This saves on garbage waste you will be carrying on trail. Having a label on the bag will help diminish the confusion later as most dried food look the same. Add additional Calories and flavor by combining the base with additional dried vegetables, milk powder, cheese powder, powdered gravy, and/or herbs, and spices for savory meals. For sweet meals, add dried fruits, unsalted nuts, chocolate chips, or candied fruit to boost flavour and Calories. At cooking time, consider adding an olive oil packet, MCT oil, or coconut oil. |
|
As the starches may take a different amount of cooking time, keep these separated from the main meal bag. Rehydrate the main meal first, then 10 or so minutes before eating, add the dry starches. You may need to add additional water as starches absorb a lot of fluids. Starches such as converted rice, couscous, quick cook pasta (such as Ramen noodles), or dry mashed potato flakes are great options.
Note: If you are crossing borders, repackaging store-bought meals should be done after the crossing. Border patrols often require dried food to be in their original packaging. There may be restrictions of certain foods and having your foods in their original packaging will help the border personnel to quickly identify these items. Rehydrating methods When rehydrating foods, heat is always best to minimise bacterial growth. Bring the water to boil, add the dried food, stir, and let simmer until it is fully reconstituted. |
The no-cook or cold-soak method consists of soaking the dried meal in cool water for no more than two hours, at the ambient temperature. This will reduce the chance of creating an environment where dormant bacteria can grow. In warm environments this method works fine for most dried foods but be warned that if the temperature drops near freezing, no amount of cold soaking will rehydrate harder elements such as beans and meats. In desert environments, do not be fooled into thinking that it will always be hot! Research the average temperatures prior to choosing this option.
The warm-soak method consists of heating the water and adding to it the dried food. The stove is then turned off and the covered pot sits for an hour or so to allow the food to reconstitute fully prior to consuming it. Some hikers use a cozy to retain the heat in the pot as much as possible.
The warm-soak method consists of heating the water and adding to it the dried food. The stove is then turned off and the covered pot sits for an hour or so to allow the food to reconstitute fully prior to consuming it. Some hikers use a cozy to retain the heat in the pot as much as possible.
|
Caching
During wilderness treks that last more than a week, it is best to consider food caching. Carrying food for more than a week in our packs is too heavy and bulky. The concept of caching is not as daunting as it may initially seem. The cache comprises of a box, or animal proof container (for wilderness drops), in which food, and other supplies are stored for use further along the trail. This requires foreplaning and an understanding of what will be needed. When the itinerary has been outlined, look over the map of the trek. Research ahead of time if there are wilderness drop off points (such as bridges, or trail heads), or community drops: post offices, ranger stations, and/or businesses that will hold a parcel for us. Keep in mind that some businesses will hold a resupply box for a fee. Post offices typically hold a parcel for 2 weeks to 30 days. At times, we have the luxury of having a support team at home that can send the cache box on prescribed dates to specific locations. We prepare the boxes ahead of time, label them, and have the payment amounts ready for our support team. |
Our cache boxes always have 2 labels. One with the destination address and another with our name, phone number, and our estimated pick-up date. We always place a thank you card and a small treat, such as cookies, in the cache boxes for the businesses that hold our parcels. In this way, we hopefully encourage these businesses to offer the same service to other hikers at a future date.
Here are some questions to consider when planning the cache:
Here are some questions to consider when planning the cache:
- How much toilet paper do you need?
- Will you need fresh batteries, new water filter cartridge, footwear, clothing, toiletries, or medications?
- How many days of food should the cache contain?
- Do you need bottled water in the cache?
- Do you need additional fuel for your stove?
|
It takes time to acquire the knowledge of our needs. Consider toilet paper. Running out of sanitary paper or carrying too much are both unsatisfactory outcomes of poor planning. Pay close attention to the amount of sanitary paper you use in a week at home. Carry your roll with you wherever you go! This process can be done for all essential items that will be packed in the cache boxes. In this way the contents of the caches will be a good estimate of what will be needed on the section.
Remember that the average weight calculation for dry food consumed is about one kilogram (2.2lbs)/person/day. Carrying more than four or five days of food in your pack makes for an overly heavy pack and will cause undo wear and tear to our bodies. Keep food caches below the five-day mark whenever possible. In dry environments it may be worth adding bottled water to caches. In this way, you can be sure to have a base amount of this lifegiving resource. As well, if you are using a fuel burning stove, calculate the amount of fuel required during your trek and add fuel cannisters to each cache. The calculation for fuel consumption is described in the Equipment section. |
In our experience, other trail users respect the wilderness caches, if they see them. We have had notes left on some of our caches with greetings from other thru hikers, but no food has ever been stolen. There were even a few times when another hiker used some of our water. But they only used a small amount to get out of a bind.

